New to dpi? This quick-start guide introduces dpi, its user interface, and core features. In the sections that follow, you’ll learn how to navigate the application, open and adjust raw files, and export your processed images with precision and control.
What is dpi
dpi (digital photo interpreter) is a software application for processing raw digital photographs. It is designed to preserve the continuity between analogue and digital photography, both in workflow and aesthetics.
Intended audience
- Photographers and image processing professionals looking for precise control over the image development process.
- Advanced users and enthusiasts familiar with photographic and colour processing terminology.
- Researchers or developers working with raw sensor data or evaluating image processing pipelines.
Platform
dpi is a cross-platform application available for macOS and Windows. Linux support is experimental.
Supported camera models
dpi supports nearly all raw file formats via the LibRaw library. For the full list of supported cameras, visit the LibRaw website.
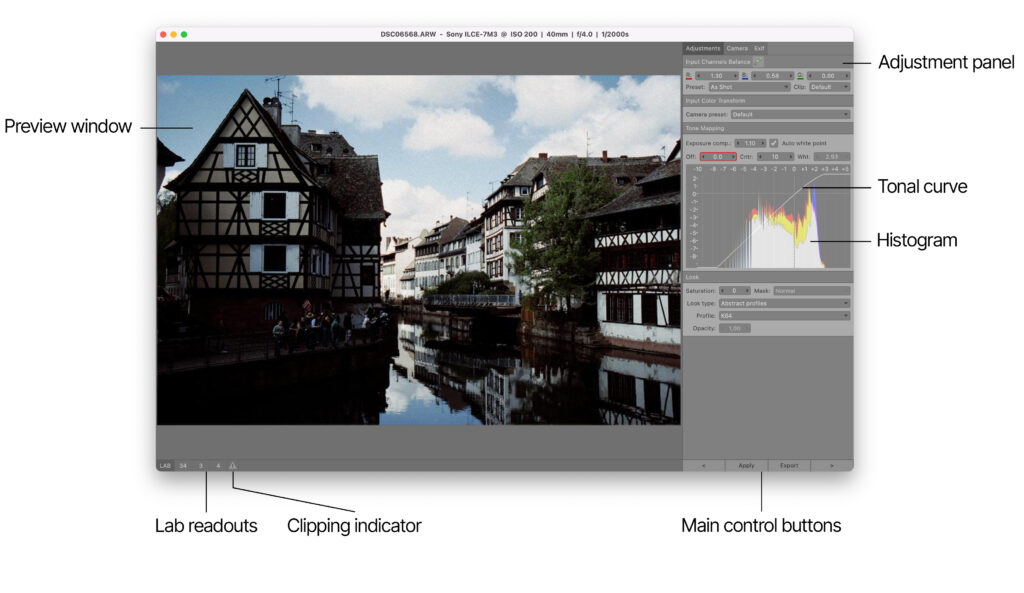
Identifying interface elements
Opening a raw file
To open a raw file, use File → Open from the menu, press CMD+O (Mac) or Ctrl+O (Windows/Linux), or drag and drop the file into the dpi application window.
dpi operates in a single-document mode, meaning only one raw file can be opened at a time. Opening a new raw file automatically closes the currently open one.
Once you open a raw file, you can navigate through raw files in the current folder by clicking the < or > buttons at the bottom right of the application window to open the previous or next raw file.
To generate the preview image, dpi uses a pixel binning algorithm, resulting in an image at half the resolution of the original raw file (half-mode preview). This approach produces the preview image quickly with sufficient quality for further image adjustments. By default , the image is scaled to fit the Preview window. To view it at actual half-resolution, double-click the image.
For every newly loaded image, dpi automatically generates an XML file that stores the current image adjustment settings. The settings file is saved in the same folder as the original image, using the same name but with the .dpi extension. This file contains colour balance parameters, tone adjustments, input and look presets.
You can further adjust the image using the adjustment panel. dpi stores all custom changes in the settings file and applies them to the preview image without altering the original raw file.
Adjusting the image
Using the Adjustment panel
The Adjustment panel is fixed in its position and cannot be customised.
To navigate forward through the fields in the Adjustment panel, press the Tab key. To navigate backward, press Shift+Tab.
To change a numeric parameter, first select it. Then adjust the value by pressing the Up or Down arrow keys. Alternatively, you can type the precise value directly into the field.
To apply any changes, use Adjustments → Apply from the menu, press CMD+R (Mac) or Ctrl+R (Windows/Linux), or click the Apply button. This updates both the image preview and the settings file.
To reset the camera’s default settings, use Adjustments → Reset from the menu, or press the CMD+D (Mac) or Ctrl+D (Windows/Linux). dpi then automatically updates the image preview and settings file.
Input channels balance
dpi supports three methods to set input channels balance:
- Clicking the Colour picker tool
- Applying per-channel linear/gain correction
- Selecting camera white balance presets, if available for your camera model
To define the grey point, select the Colour picker tool and click or drag over a neutral area. Clicking samples a 7×7 pixel area, while dragging allows you to select a larger area. dpi then automatically updates the image preview and settings file with the new input channels balance settings.
Input colour transform
A camera preset consists of a camera profile and a gamma value. By default, dpi uses a generic profile provided by LibRaw, with gamma set to 1. To use a custom preset, you should first create it.
To create a custom preset:
- Go to the Camera tab and locate the Input Colour Transform section.
- Click the Settings button next to the Preset drop-down list and choose Add. A new preset “Custom” is created and set as the current camera preset. It initially uses the LibRaw generic profile and a Gamma value of 1.
- Load your .icc profile by choosing <Browse…> option in the Profile drop-down list and set the path to the file.
- Set the Gamma value in the numeric field.
To rename or delete the current preset:
- Go to the Camera tab and locate the Input Colour Transform section.
- Click the Settings button next to the Preset drop-down list and choose the desired action.
Tone mapping
Use the tone mapping section to control the overall brightness and contrast of the image by adjusting Exposure compensation, Offset, Contrast, and White point.
Exposure compensation increases or decreases the image brightness: +1 stop doubles the exposure, while -1 stop halves the exposure. The parameter ranges from -10 to 99.99.
You can visually estimate the distribution of brightness using the histogram. The vertical axis represents how many pixels fall into each brightness level. The horizontal axis shows exposure levels on a logarithmic scale, where each step corresponds to one stop of exposure.
Offset raises or lowers the tone curve, brightening or darkening all tones evenly (range: -50 to 50).
Contrast increases or decreases the steepness of the tone curve, enhancing or reducing the difference in brightness between the dark and light areas (range: -50 to 99).
White point adjusts the upper end of the tone curve, stretching or reducing the highlights. By default, the white point is set automatically. To set the white point manually, uncheck the Auto white point box and adjust the White point numeric parameter (range: 0.18 to 10).
As you adjust the Offset, Contrast, or White point, the tone curve updates in real time. To update the histogram and preview image, press the Apply button.
Look
Saturation and Mask
To adjust the colour intensity of the image, use the Saturation numeric parameter (range: -100 to 500).
To apply saturation selectively, based on pixel brightness, use the Mask drop-down list:
- Normal – applies saturation uniformly across the entire image (default)
- Lightness – applies saturation more strongly to brighter areas of the image
- Inverted Lightness – applies saturation more strongly to darker areas of the image
Look type, Profile and Opacity
dpi supports two main types of colour profiles, selectable from the Look type drop-down list:
- Abstract profiles – choose K64 or V50 in the Profile drop-down list
- Colour LUTs – apply predefined colour lookup tables
The Opacity parameter ranges from 0 to 1 and controls the strength of the applied Colour LUT effect.
Transferring image settings
dpi automatically transfers current image settings to the next image opened in the same session, provided the next image has no associated .dpi settings file yet.
Exporting images
To export an image, use File → Export from the menu, or click the Export button. The Export Current Image window opens.
By default, the file is saved to the same folder as the original raw file, but you can specify a different location or create a subfolder.
The exported file uses the same filename as the original raw file by default, but you can rename it. Note: dpi overwrites any previously exported file with the same name and extension without warning.
You can export JPEG and TIFF files. For the exported file, you can choose either full or half preview resolution.
To export multiple images from the same folder, use File → Batch from the menu. Only images previously opened in dpi (those having a .dpi settings file) will be exported.